I like my makeup to add that polish to my overall look, but I don’t want to look really made up. I still want to look normal, just polished, which is very similar to my clothing style and how I want to look cute and put together, but normal. It’s also similar to my clothing style in that I use a handful of products that are more expensive mixed with lots of drug store items. (Basically like how I’ll wear a pair of Old Navy jeans, a $30 top, and a $100+ pair of UGG wedges.)
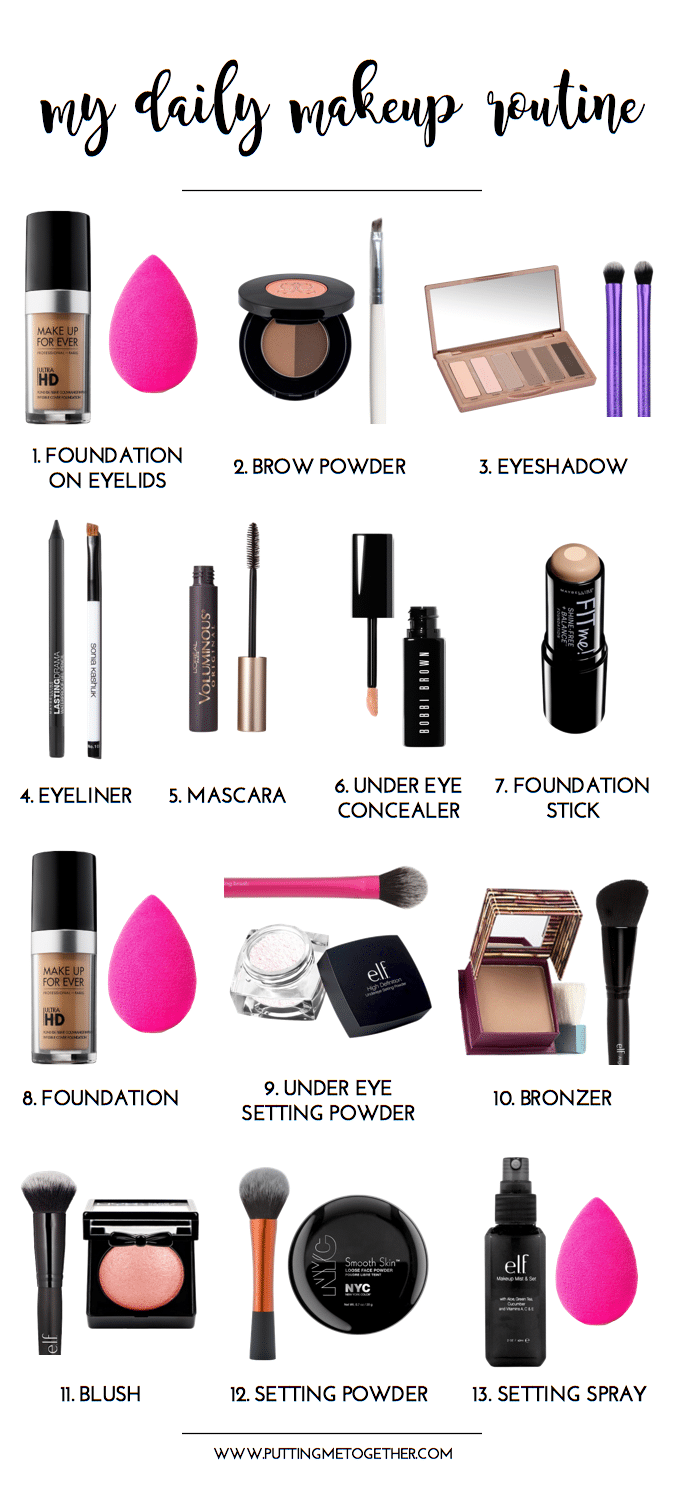
I’ve been wanting to share it for a long time, but I didn’t have a great method to do so as taking pictures of each step or doing a video didn’t seem feasible. It wasn’t until I saw Fran post a nifty collage of her daily makeup routine that I finally had a handle on a way I could easily share mine. Yayyyyy, thanks, Fran!
Time: Under 10 Minutes
It seems like a lot of steps, but it takes me under 10 minutes. That’s my limit, and even anything over 7 minutes makes me antsy and itching to be done! Many times I’ll skip bronzer, blush, and even the setting powder if I start getting antsy. 😛
My Skin Type
Honestly, I don’t know what my skin type is, haha! (Remember how I said I’m no expert on makeup. Ummm, yep. Evidence right there. 😛 ) I’ve been told I have combo skin, as I think my skin is mostly normal but more oily in the t-zone.

0. Moisturizer. It’s not included in the collage above, but I apply moisturizer which helps my foundation have something to stick to. Mine has SPF which adds a slightly stickier texture and helps my makeup stay better. I stopped using primers because I didn’t feel like they were helping, or they were too intense for my skin and gave me rashes or dry eczema-type spots.
1. Make Up Forever HD Foundation
Is it weird that I start with my eyes only instead of foundation all over my face? I’ve seen videos of people doing either. I start with my eyes to give the rest of my face a few minutes to absorb the moisturizer, which helps my foundation stay on longer. I also do this in case I get any eye product on my face–it’s easier to clean it off of a blank slate.
I will talk more about this foundation in Step 8, but I use a Beauty Blender to dab foundation onto my eyelids to even out some discoloration.
2. Anastasia Brow Powder
I’m not THAT picky about my eyebrows, but it’s been ingrained in me ever since I started wearing makeup that eyebrows frame the face, so mine are always done! I use a very small angled brush like THIS with Anastasia Brow Powder in Dark Brown to extend my brows to start closer to my nose and fill in the rest of my brows a little more. This thing has lasted me forever. I’ve been using it for several years and STILL haven’t hit the bottom of the pan.
3. Urban Decay Eyeshadow
I love this palette! I gave it a shot a couple years ago after reading about its versatility, and I never turned back. It has a lot of pigment and goes on really smoothly. I use a flat brush like THIS to dab Stark all over my lid and then sweep it on my brow bone. Then I use a crease brush like THIS to sweep Cover into my crease and a little above. Finally, I use the same crease brush to apply Primal to the outer corners of my eye for a bit more definition. This products also goes a really long way. I’ve been using the same palette everyday for two years!
4. Maybelline Eyeliner
I’ve gone through lots and lots of drugstore eyeliners, and this eyeliner in Onyx is my current favorite. I love how bold it is, though because of that I need to apply it gently by dotting along my lash line instead of drawing one firm, continuous line. I go a little past the outer corners of my eyes. Then, I use this angled brush to smooth it out and smudge it into my lash line more. I only line my upper lash line and skip the bottom for my everyday routine.
One thing I dislike is that I have a hard time sharpening it without feeling like I’m wasting a lot of product. Often times a lot of it ends up smushed in the sharpener.
5. L’Oreal Mascara
I use a hefty two coats of this mascara and really try to get into the base of my lashes. I’ve noticed when I’m lazy about the base, that eyeliner that I applied earlier will actually run down to my lower lids and give me raccoon eyes. The mascara serves as a barrier.
While I like the L’Oreal mascara, I would love to have even thicker lashes and am open to trying some of the non-drugstore favorites like Better Than Sex Mascara or the They’re Real mascara. (The latter is linked to the travel size, which is cheaper to try. That site also has free shipping and free returns!)
6. Bobbi Brown Under Eye Corrector
I have dark circles under my eyes, and this under eye corrector was recommended to me by someone at Sephora. I have tried quite a few different concealers and under eye correctors, from drug store products to It Cosmetics Bye Bye Under Eye (linked to travel size because it’s cheaper). The Bobbi Brown one is the best I’ve tried so far. All the rest actually enhanced my dark circles, which I think is again because the colors don’t work for my skin tone. But the Bobbi Brown corrector comes in an array of colors, and the Peach really counters and conceals my dark circles while still looking like my skin.
I dab just two dots under each eye from the tube. It starts out really orange, but that’s why it counters my blueish dark circles so well! Then I use my finger to dab it into my skin and blend it out. I blend it more with a beauty blender when I apply the rest of my foundation.
I didn’t love it at first because I couldn’t get it to stay on, and I felt for such an expensive product it shouldn’t budge. Even when the Sephora makeup artist applied it, it didn’t stay on. However, I finally figured out how to get it to stay put for just $2.50 (see Step 9)!
7. Maybelline Foundation Stick
I tried this because Rebecca from Mommy In Heels said she used it to provide additional coverage in specific spots. I wanted to even out some discoloration around my nose, but I ended up really liking this product because it helps keep my foundation on the more oily parts of my skin. I draw a few lines on and around my nose and chin. I blend it out in Step 8 with the rest of my foundation. I use this in Pure Beige, and though it’s not a perfect match it doesn’t matter because I’ll go over it with Step 8.
8. Make Up Forever HD Foundation
This is the first non-drugstore foundation I started using regularly. The shades in drugstores usually aren’t great matches for the yellow that’s in my Asian skin and end up making me look cakey, dry, or like my skin is dull. This Make Up Forever HD Foundation has a really wide range of colors. It provides medium coverage and looks really natural with a bit of dewiness. As far as drugstore brands go, I like L’Oreal’s Infallible Glow Pro Foundation, but the shades aren’t as great of a match as Make Up Forever is for me.
I apply this with a Beauty Blender and dab/press it into my skin, as opposed to simply swiping it across my face. That way, my skin can absorb it so that it stays in place better.
Random note: I don’t apply any foundation to my forehead. I know, kinda weird! I just really don’t like foundation on my forehead for some reason!
I’m also interested in trying Tarte’s Amazonian Clay (or free shipping version HERE).
9. elf Under Eye Setting Powder
I heard great reviews about this from a lot of those “best drugstore makeup” posts, and it’s the best $2.50 I’ve spent. This setting powder keeps the Bobbi Brown concealer in place, whereas otherwise the concealer would slide off within just a couple hours. It’s finer, which works better with fine lines that are also under my eyes. Soooo glad I started using this!
I pat a good amount onto my under eye with this Real Techniques brush. I’ve heard great things about Real Techniques brushes (which I also linked to in the eyeshadow step) as really good brushes for how little you pay.
10. Benefit Bronzer // Cheaper travel size HERE // Ulta HERE
I love how this shade contours my face in a really warm and natural way. Tons and tons of people love this, and I hear it’s great on a variety of skin tones. I apply it with this angled elf brush (only $4!) right under my cheekbones and a little up towards my temples. I’ve heard elf brushes are really good for the price but that the ones with the black handles are much better than the regular ones with white handles, and for only $1-2 more.
11. NYX Blush
This drugstore blush is really subtle, and it just adds a light flush to give my face some color. I apply it along my cheekbones with this elf brush.
12. NYC Setting Powder
I’m really interested in trying the Laura Mercier translucent setting powder or the It Cosmetics Bye Bye Pores silk powder, but for under $4, this NYC powder ain’t too shabby. I apply it with this big Real Techniques brush.
13. elf Setting Spray
I’d heard great things about this as well, and for $3, I was willing to try it. At first, I spritzed it on my face a few times, but I didn’t really like doing that nor felt it was effective. I saw a few beauty bloggers spray it onto their Beauty Blenders instead, and I’ve liked that much better. This adds extra reinforcement for my makeup to stay in place longer, and for $3 it’s totally worth it. Often times I’ll skip powder and just do this setting spray.
There it is! Also, I never wear anything besides chapstick on my lips because it’s hard for me to find colors that I like, but mostly I just don’t like how it feels whenever I have anything else on my lips. Can’t stand it!
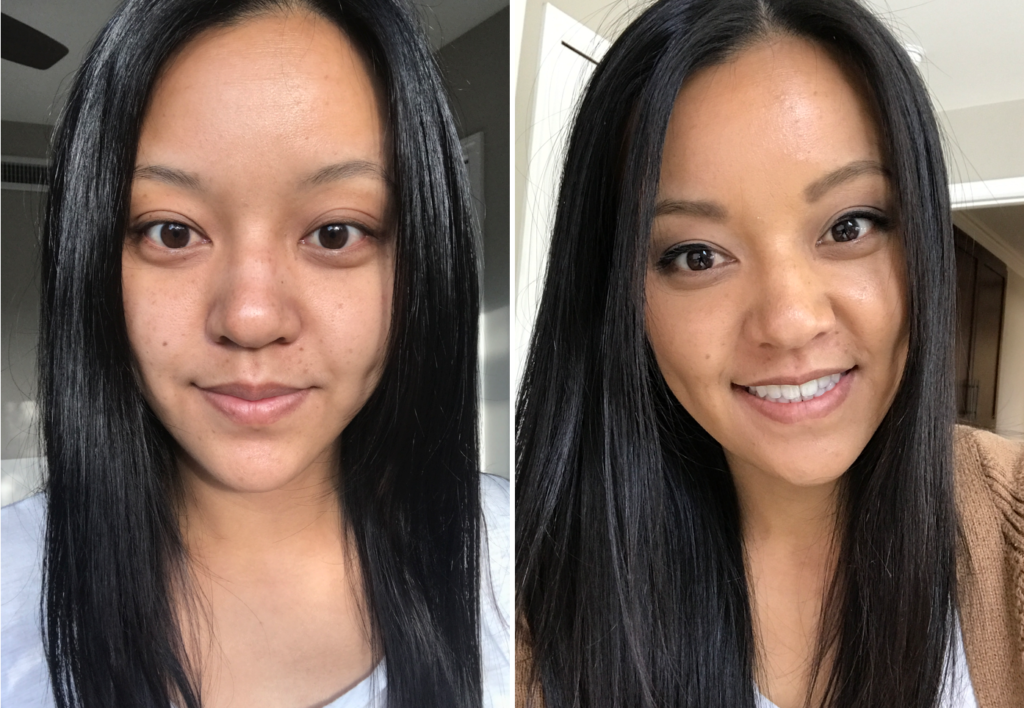
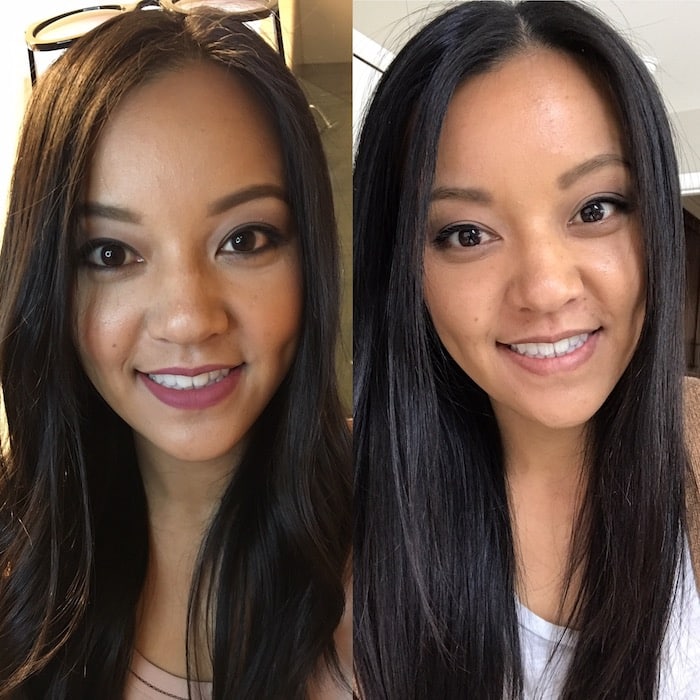
Here’s a before and after! In the picture on the right above, I’m not even wearing bronzer, blush, or powder. And one of my eyebrows is bugging me, hahaha! It was one of those quick days, and I wasn’t precise or meticulous. But, realistically that’s kinda how many days are for me with everyday makeup!
Like I said, I’m still testing out a few different products, but for the most part I’m pretty happy with this routine!
And for fun, here’s a picture of when a makeup artist at Sephora did my makeup (eek, no thanks) and my normal daily look! On the left is from Sephora. It took way longer than I have tolerance for. (Remember my 7-10 minute limit?) It’s way too made up for my taste, and it took wayyyy longer than I have tolerance for. Remember my 7-10 minute limit? This took like 20-25 minutes. Plus, whatever she did didn’t really last through out the day! Regardless, I love this side by side comparison because it shows how different makeup can make you look!